Steam Frame face tracking
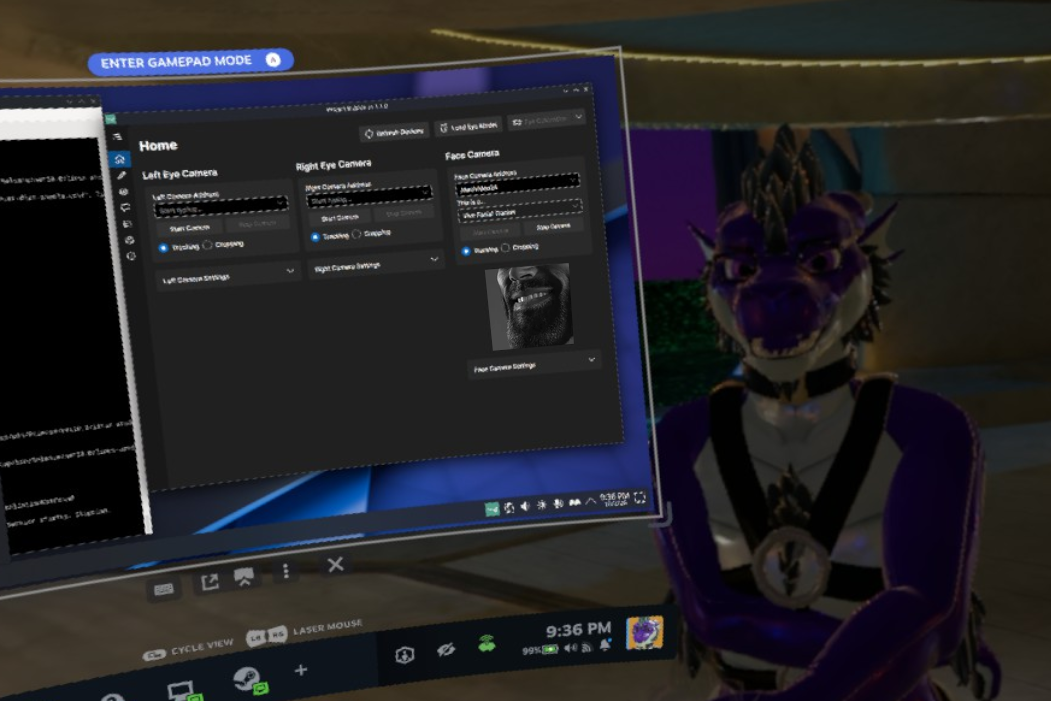
Background
I assume you have at least some experience with Linux, are comfortable with command line tools, and can set up the ssh access to your frame. With that, let’s get started!
Hardware
What you’ll need:
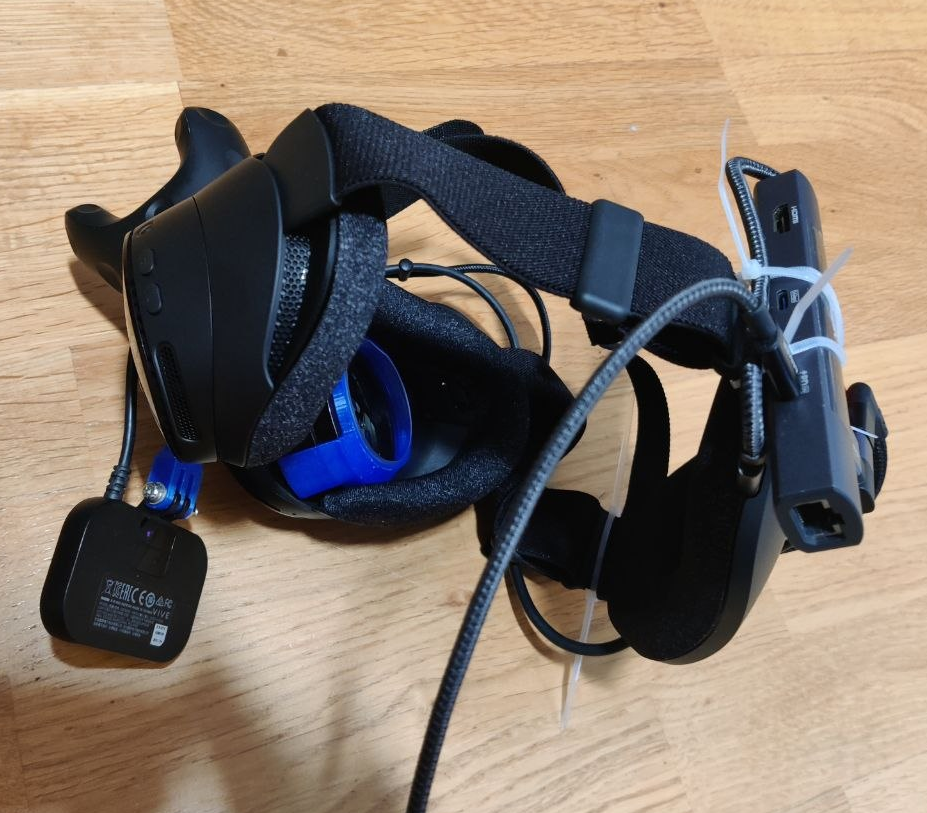
- USB webcam (I used the unobtanium Vive Facial Tracker, but any should work)
- A way to mount it (many 3d-printable mounts are online, I used this one
- USB hub with PD input, if you want to charge or use a power bank while playing (I used this one). Currently mounted with zip-ties, will eventually figure out a better way :’)
Note: I’ve since switched to the Smallrig USB hub - smaller, and easier to mount. One caveat - Vive Facial tracker does not work plugged into the USB 2.0 ports directly due to some weird USB-C signalling I’m yet to learn about - but it does, if you use a C-to-A and A-to-C adapters in-between. Yay :D
Software
Summary
Linux is Linux, so things should just work! BUT! We have a few holes to plug. The root filesystem is read-only, and there are very few drivers shipped by default. Also, Baballonia needs to be built from source, to get a proper arm64 build with all the permissions.
Changes to ~/.bashrc
# If not running interactively, don't do anything
[[ $- != *i* ]] && return

#---- History things, not required ----

HISTFILE=/home/$USER/.bash_history_bak/current

# don't put duplicate lines in the history. See bash(1) for more options
# force ignoredups and ignorespace
HISTCONTROL=ignoreboth

# append to the history file, don't overwrite it
shopt -s histappend

HISTSIZE=99999999
HISTFILESIZE=99999999
HISTTIMEFORMAT="%y/%m/%d %T "

# for setting history length see HISTSIZE and HISTFILESIZE in bash(1)
PROMPT_COMMAND='let ret=$?; history -a; echo -ne "\033]0;terminal\a"'
#PROMPT_COMMAND='let ret=$?; history -a; history -n'

#---- Needed for distrobox

export PATH="$HOME/.local/bin:$PATH"
# edit this alias if your setup is different
alias d='distrobox enter --root rarch'

#---- Needed for dotnet/Baballonia

export DOTNET_SYSTEM_GLOBALIZATION_INVARIANT=1
export DOTNET_ROOT="$HOME/.dotnet"
export PATH="$PATH:$DOTNET_ROOT:$DOTNET_ROOT/tools"

#---- Where I put the Baballonia script later

export PATH="$HOME/bin:$PATH"
Don’t forget to apply the changes after you make them with . ~/.bashrc
A Debian
Create a debian so we can install things; can use an Arch too, but you’ll be on your own with packages there
curl -s https://raw.githubusercontent.com/89luca89/distrobox/main/install | sh -s -- --prefix ~/.local
distrobox create --image docker.io/library/debian:sid --name rarch --root
distrobox enter --root rarch


sudo apt update
# some are needed for Baballonia
sudo apt install vim git patchelf libudev-dev v4l-utils libgstreamer1.0-0 libgstreamer-plugins-base1.0-0
sudo apt build-dep linux
Building the kernel module for the uvc camera
Valve, plz ship the kernel sources and/or the common modules, this took waaaay too long to figure out
Here’s a script to get and build the kernel modules; read and try to understand it before running :)
#!/bin/bash

# uncomment print everything being done
#set -x
# exit on error
set -e

KERNEL_PKG=linux-618-deckard-headers
KERNEL_VERSION=6.18.0
KERNEL_COMMIT=refs/tags/v6.18

fork_to_distrobox() {
  HEADERS_URL=$(pacman -Spdd $KERNEL_PKG)
  distrobox enter --root rarch -- $0 "$HEADERS_URL"
  exit 0
}

test -n "$1" || fork_to_distrobox

test -e headers.pkg.tar.zst || wget "$1" -O headers.pkg.tar.zst

# hiding .git to prevent the "-dirty" suffix added to the kernel version
test -d linux-$KERNEL_VERSION || (
  git clone --depth 1 --revision=$KERNEL_COMMIT https://github.com/torvalds/linux.git linux-$KERNEL_VERSION
  mv linux-$KERNEL_VERSION/.git linux-$KERNEL_VERSION/git-old
  override CFLAGS += -Wno-error=discarded-qualifiers
)

pushd linux-$KERNEL_VERSION


# uncomment to re-build everything
#make distclean

zcat /proc/config.gz | sed -e 's/^# CONFIG_MEDIA_USB_SUPPORT is not set$/CONFIG_MEDIA_USB_SUPPORT=y\n\
CONFIG_USB_VIDEO_CLASS=m\n\
CONFIG_UVC_COMMON=m\n\
CONFIG_VIDEOBUF2_VMALLOC=m/' > .config

tar --strip-components=5 -xf ../headers.pkg.tar.zst usr/lib/modules/$(uname -r)/build/Module.symvers

# HOSTCFLAGS is a workaround for a newer GCC version being used
MAKE_ARGS="LOCALVERSION=$(uname -r | sed s/^$KERNEL_VERSION//) HOSTCFLAGS=-Wno-error=discarded-qualifiers"

make $MAKE_ARGS olddefconfig
make $MAKE_ARGS modules_prepare
make $MAKE_ARGS -C . M=drivers/media/common
cat drivers/media/common/Module.symvers >> Module.symvers # Don't ask
make $MAKE_ARGS -C . M=drivers/media/usb/uvc


popd
Run the script outsite the distrobox.
If everything went well, modules will be compatible. If not, you’ll get errors from insmod below.
cd linux-6.18.0/drivers/media

sudo insmod ./common/videobuf2/videobuf2-vmalloc.ko
sudo insmod ./common/uvc.ko
sudo insmod ./usb/uvc/uvcvideo.ko
dmesg will show the camera being found at this point, hopefully. Make sure it’s plugged in! :D
If modules work, let’s install them, and make them load when the system boots.
cd linux-6.18.0/drivers/media
MOD_DIR=/lib/modules/$(uname -r)/kernel/drivers/media

sudo steamos-readonly disable

sudo mkdir -p $MOD_DIR/common/videobuf2/
sudo mkdir -p $MOD_DIR/usb/uvc

sudo cp common/videobuf2/videobuf2-vmalloc.ko $MOD_DIR/common/videobuf2/
sudo cp common/uvc.ko $MOD_DIR/common/
sudo cp usb/uvc/uvcvideo.ko $MOD_DIR/usb/uvc/
sudo depmod

# autoload uvcvideo
echo 'uvcvideo' | sudo tee /etc/modules-load.d/90-uvcvideo.conf

# keep the autoload when the system updates
echo '/etc/modules-load.d/90-uvcvideo.conf' | sudo tee /etc/atomic-update.conf.d/90-uvcvideo-modules-load.d.conf

sudo steamos-readonly enable
OS update will remove them, but that’s ok since we will most likely need to rebuild and reinstall them anyway. Make sure to do this if the OS updates!
Baballonia
Get dotnet:
cd

wget https://builds.dotnet.microsoft.com/dotnet/Sdk/10.0.401/dotnet-sdk-10.0.401-linux-arm64.tar.gz

mkdir ~/.dotnet
tar zxf dotnet-sdk-10.0.401-linux-arm64.tar.gz --no-same-owner -C ~/.dotnet
Now, clone and build Baballonia:
git clone https://github.com/Project-Babble/Baballonia.git
cd Baballonia
git submodule update --init --recursive
bash download_dependencies.sh
cd src/Baballonia.Desktop/
dotnet publish -r linux-arm64 -c Release --self-contained -f net10.0
Make a launch script for baballonia: ~/bin/baballonia
#!/bin/bash

# TODO: auto-detect steam streaming host and update the IP in settings?

# auto-detect the camera path and update the settings to use it
CFG="$HOME/.config/ProjectBabble/ApplicationData/LocalSettings.json"
CAM="$(v4l2-ctl --list-devices | grep -A1 '^HTC Multimedia Camera' | tail -n 1 | tr -d ' \t')"
if [ -z "$CAM" ]; then
  echo "Camera not found!"
  exit 1
fi
jq ".LastOpenedFaceCamera=\"$CAM\"" "$CFG" > "$CFG.tmp" && mv "$CFG.tmp" "$CFG"

"$HOME/Baballonia/src/Baballonia.Desktop/bin/Release/net10.0/linux-arm64/Baballonia.Desktop"
Baballonia configuration
I had to run Baballonia in Desktop mode, running it as an app directly doesn’t work for some reason (UI breaks).
On the main screen, only edit the Face camera, eye tracking is sent by Steam itself. If you click the dropdown, you will see video99 as the steam virtual camera, and hopefully whatever other USB camera you have plugged in. BUT! Do not choose it in the dropdown - type /dev/videoXX in the field directly. Once you do, if you are using the Vive Facial Tracker, select that option in the dropdown below, otherwise keep it as V4L2 device. Then, click Start Camera, and, if everything went well, you will see the camera feed of your face!
Only thing left is to change where the data is sent to: click the gear on the left of the window to go to settings, open the OSC section, and change the IP address for the PC you will be steaming from.
On that PC, you will need to have VRCFaceTracking running, with 2 modules - SteamLink VRCFT module for the eye tracking, and Project Babble Module for the face tracking. Once you install those modules and run it once, close it, and edit the config file (on linux it’s in ~/.config/VRCFaceTracking/CustomLibs/{long-hex-uuid-starting-with-3-probably}/BabbleConfig.json: change "Host": "127.0.0.1" to the IP of the computer, so it can actually receive the Babble data from the headset. If all went well, the face tracking should work now! :D